
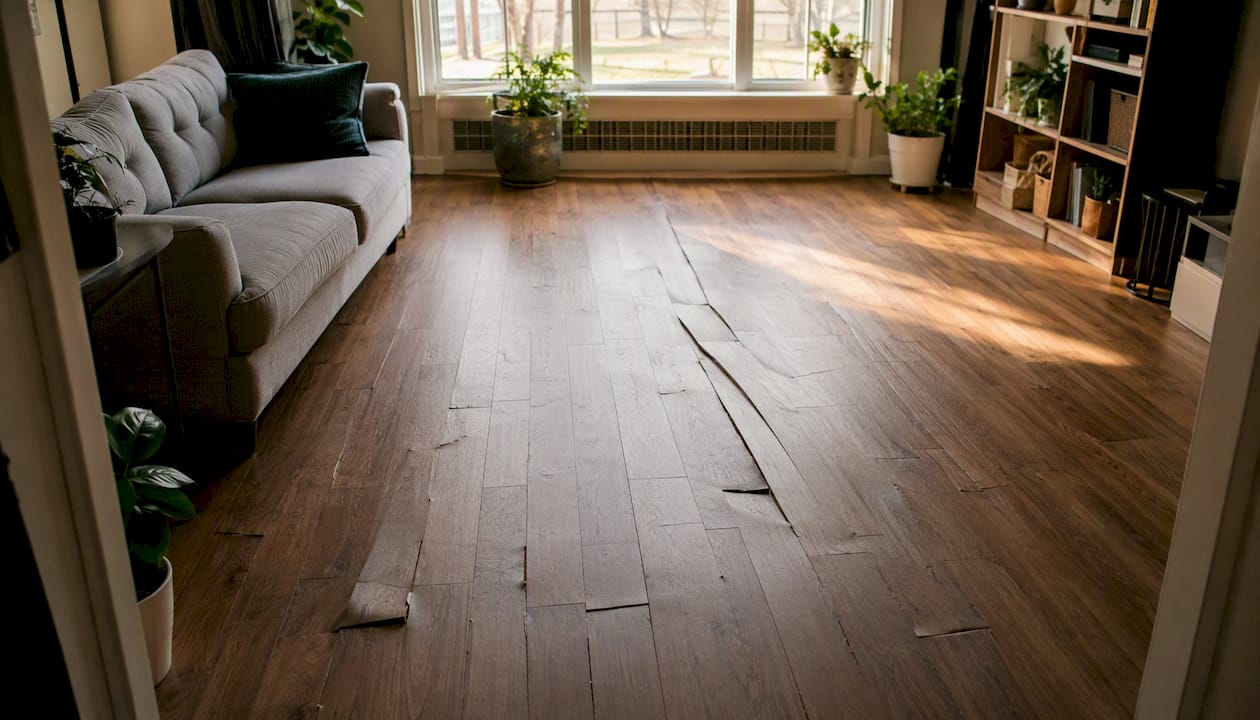
Laminate floors warp mainly because their HDF (high-density fiberboard) core absorbs moisture or because the floating installation cannot move laterally due to missing expansion gaps or pinch points. Both mechanisms are predictable, diagnosable, and largely preventable.
If you’re dealing with warping right now, do these three things first:
- Stop the water source. Turn off the supply line, appliance, or humidifier causing the moisture.
- Remove standing liquid and start drying. Blot or wet-vac the area, then run fans and a dehumidifier.
- Call a professional immediately if the source is a plumbing failure, sewage backup, or major flood.
Minor surface distortion from a brief spill can sometimes settle once the area dries completely. But when the HDF core has swollen, those planks rarely return to their original dimensions. Replacement is usually the outcome.
Key Takeaways
Laminate floors warp because moisture swells the HDF core or because missing expansion gaps and pinch points prevent the floating floor from moving as designed.
| Point | Details |
|---|---|
| Two root causes | Moisture in the HDF core and movement restriction from missing gaps or pinch points account for most warping. |
| Pattern diagnosis | Straight-line buckling near walls or cabinets suggests restraint; irregular patchy lifting suggests moisture ingress. |
| Immediate triage | Stop the water source, dry the area for 48–72 hours, and document damage before removing anything. |
| Repair vs. replace | Minor distortion may settle after drying; swollen HDF cores and separated locking joints require plank replacement. |
| Top prevention steps | Acclimate planks, test subfloor moisture, install a vapor barrier over concrete, and maintain indoor RH between 30% and 50%. |
Table of Contents
- How laminate is built and why it warps so predictably
- What causes laminate floors to warp: a breakdown by cause
- How to inspect your floor and identify the real cause
- What to do in the first 48–72 hours
- Should you repair it or replace it?
- How to prevent warping before it starts
- Myth-busting: what “waterproof” laminate actually means
- A practical note from the field
- Ready to replace or upgrade your floor?
- Sources
- FAQ
How laminate is built and why it warps so predictably
Laminate is a layered product. From top to bottom: a clear wear layer, a decorative photographic layer, an HDF core, and a backing sheet. The HDF core is the structural heart of the plank, and it is hygroscopic — it absorbs moisture from the air and from direct contact with water, then swells.
That swelling is the root of most laminate floor damage. Because laminate is a floating floor (meaning it sits on top of the subfloor without being fastened to it), the entire field of planks must be free to expand and contract as temperature and humidity shift. Manufacturers require expansion gaps around every perimeter, typically at walls, door frames, and fixed objects, so the floor has somewhere to move.
When those gaps are missing or blocked, the floor has no relief. Expansion pressure concentrates at the locking joints (the tongue-and-groove connections between planks), and the floor buckles upward. When moisture enters the HDF core through seams, cut edges, or surface scratches, the core swells and the plank distorts from within.
A short glossary worth knowing:
- HDF core: High-density fiberboard, the structural layer of a laminate plank; highly moisture-sensitive.
- Floating floor: A floor system not fastened to the subfloor; relies on expansion gaps to manage movement.
- Expansion gap: The deliberate space (typically 1/4 to 3/8 inch) left at all fixed perimeters.
- Tongue-and-groove / locking joint: The interlocking edges that connect planks; a common moisture entry point.
- Pinch point: Any fixed object (cabinet base, island, appliance) sitting directly on the floating floor and blocking lateral movement.
One more thing worth saying plainly: the moisture effects on laminate differ depending on where the water comes from. Moisture from below (a wet concrete slab) tends to cause cupping, where plank edges rise. Moisture from above (a spill) tends to cause crowning or localized bubbling. Moisture through seams causes irregular swelling along joint lines. The distortion type is itself a diagnostic clue.
What causes laminate floors to warp: a breakdown by cause
Understanding the specific cause behind your floor’s distortion tells you which fix to pursue. Here are the main causes, their typical signs, and where to look first.
Moisture from spills, leaks, and flooding
The most common cause of laminate buckling is direct water contact. A slow dishwasher leak, a refrigerator ice maker supply line dripping for weeks, a pet’s water bowl left on bare laminate — all of these deliver enough moisture to saturate the HDF core over time.
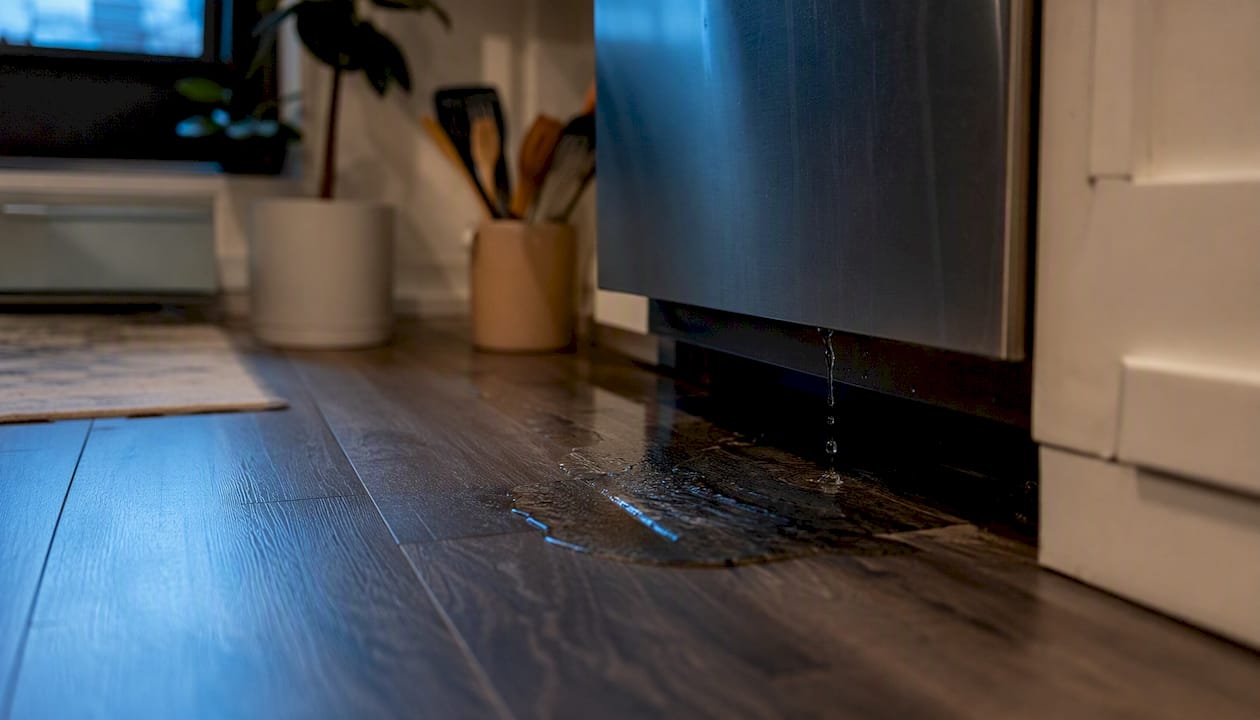
Signs: localized swelling near the water source, surface bubbling or cracking, discoloration, and a musty odor that suggests mold developing beneath the planks.
High indoor humidity and seasonal swings
Laminate expands when ambient humidity rises and contracts when it drops. Homes without consistent climate control, or rooms that swing from 20% relative humidity in winter to 70% in summer, put constant stress on the locking joints. Over several seasons, that cycling fatigues the connections and produces edge gaps or low-level buckling.
Subfloor moisture and wet concrete slabs
Concrete releases moisture vapor continuously, especially in basements and slab-on-grade construction. Without a proper vapor barrier between the concrete and the underlayment, that moisture migrates upward into the HDF core from below. Signs: widespread cupping across the room, not just near walls or appliances.
Missing or blocked expansion gaps
Insufficient expansion gaps and pinched baseboards are among the most frequent installation mistakes. When a floor is installed tight to the wall with no gap, or when heavy furniture or cabinetry is placed directly on the floating field, there is nowhere for the floor to move. The result is straight-line buckling that runs parallel to walls or cabinet runs — a pattern that points directly to movement restriction rather than moisture.
Pinch points from fixed cabinetry and appliances
Kitchen islands, bathroom vanities, and built-in appliances set directly onto a floating laminate floor create what installers call pinch points. These block lateral movement across the entire field. Even a small amount of thermal expansion or moisture-driven swelling has no relief, so the pressure concentrates at the nearest locking joints and lifts them. This is one of the most insidious causes of floor buckling because the floor can look fine for months before the stress accumulates enough to show.
Direct sunlight and heat exposure
Sustained heat from south-facing windows or radiant heat sources causes the planks to expand beyond their design tolerance. In rooms with large windows and no window treatments, you may see cupping or crowning that correlates with sun exposure patterns — worse on the sunny side of the room, better near interior walls.
Poor-quality HDF core and material failure
Not all laminate is built the same. Thinner cores, lower-density fiberboard, and weak locking profiles fail faster under the same moisture or movement stress that a higher-quality product would handle. Signs of material failure include crumbling plank edges, surface delamination (the decorative layer separating from the core), and widespread joint failure that appears even in dry conditions.
Improper underlayment or missing vapor barrier
Underlayment that is too thick, too soft, or mismatched to the plank profile creates a spongy substrate that allows planks to flex under foot traffic. That flexing stresses the locking joints over time. A missing vapor barrier over concrete accelerates subfloor moisture transfer. Both are installation-stage decisions that show up as problems months or years later.
Cause-to-symptom quick reference:
| Cause | Typical signs | First place to check |
|---|---|---|
| Spill or appliance leak | Localized swelling, bubbling, discoloration | Near dishwasher, fridge, sink |
| Subfloor moisture | Widespread cupping, musty odor | Center of room, basement slab |
| Missing expansion gap | Straight-line buckling near walls | Perimeter gaps under baseboards |
| Pinch point | Buckling near cabinets or islands | Cabinet bases, fixed appliances |
| High humidity / seasonal | Edge gaps, low-level crowning | Whole room, correlates to season |
| Sunlight / heat | Cupping on sun-exposed side | South-facing window areas |
| Material failure | Crumbling edges, delamination | Seams, cut edges, high-traffic areas |
Pro Tip: Straight, parallel buckling lines near a wall or cabinet run almost always mean movement restriction. Irregular, patchy lifting scattered across the room points to moisture ingress. That pattern distinction alone narrows your diagnosis before you pull a single plank.
How to inspect your floor and identify the real cause
Start with a visual map. Walk the entire floor and mark where the distortion appears — near walls, under appliances, in the center, or along seams. That spatial pattern is your first diagnostic data point.
Check the perimeter gaps
Slide a thin putty knife or a business card along the base of the baseboard at several points around the room. You should find a gap of roughly 1/4 to 3/8 inch. If the floor is tight against the wall with no gap at all, movement restriction is a strong candidate. While you’re there, check whether any cabinetry or appliances sit directly on the laminate field rather than on the subfloor.
Inspect near appliances and water sources
Pull the refrigerator, dishwasher, or washing machine away from the wall and look at the floor underneath. Slow, hidden leaks around appliance supply lines are a common and easily overlooked source of laminate damage. Look for discoloration, soft spots, or a musty smell. Check under the sink cabinet as well.
Use a moisture meter
A pin-type or pinless moisture meter gives you a relative reading of moisture content in the planks and the subfloor. Readings significantly elevated compared to an unaffected area of the same floor confirm moisture ingress. You can rent or buy a basic moisture meter at most home improvement stores for under $30.
A hygrometer placed in the room for 24 hours tells you whether ambient humidity is the driver. If indoor RH consistently rises above about 60%, the floor may be under chronic moisture stress.
Read the distortion type
As noted earlier, cupping (edges higher than center) suggests moisture from below. Crowning (center higher than edges) suggests moisture from above or drying after a top-surface wetting event. Buckling (planks lifting off the subfloor entirely) suggests either severe moisture saturation or movement restriction. The type of distortion is a meaningful diagnostic signal, not just a description of the damage.
Safety note: If the water source was a sewage backup or a Category 3 (black water) flood, stop the inspection and call a water-damage remediation professional. DIY work in contaminated water environments carries real health risks.
What to do in the first 48–72 hours
Speed matters. Once water penetrates laminate surface layers, it can move quickly through boards and cause bubbling, discoloration, mold risk, and buckling. Here is the priority sequence:
- Stop the water source. Turn off the supply valve, appliance, or humidifier. Do not skip this step.
- Remove standing liquid. Use towels, a wet-vac, or a mop. Get as much surface water off as quickly as possible.
- Move furniture off the wet area. Furniture weight on wet planks accelerates distortion.
- Lift wet rugs and mats. These trap moisture against the surface and prevent evaporation.
- Ventilate and run a dehumidifier. Open windows if outdoor humidity is lower than indoor. Run a dehumidifier and box fans continuously for 48–72 hours.
- Document the damage. Photograph everything before you move or remove anything. This matters for warranty claims and insurance.
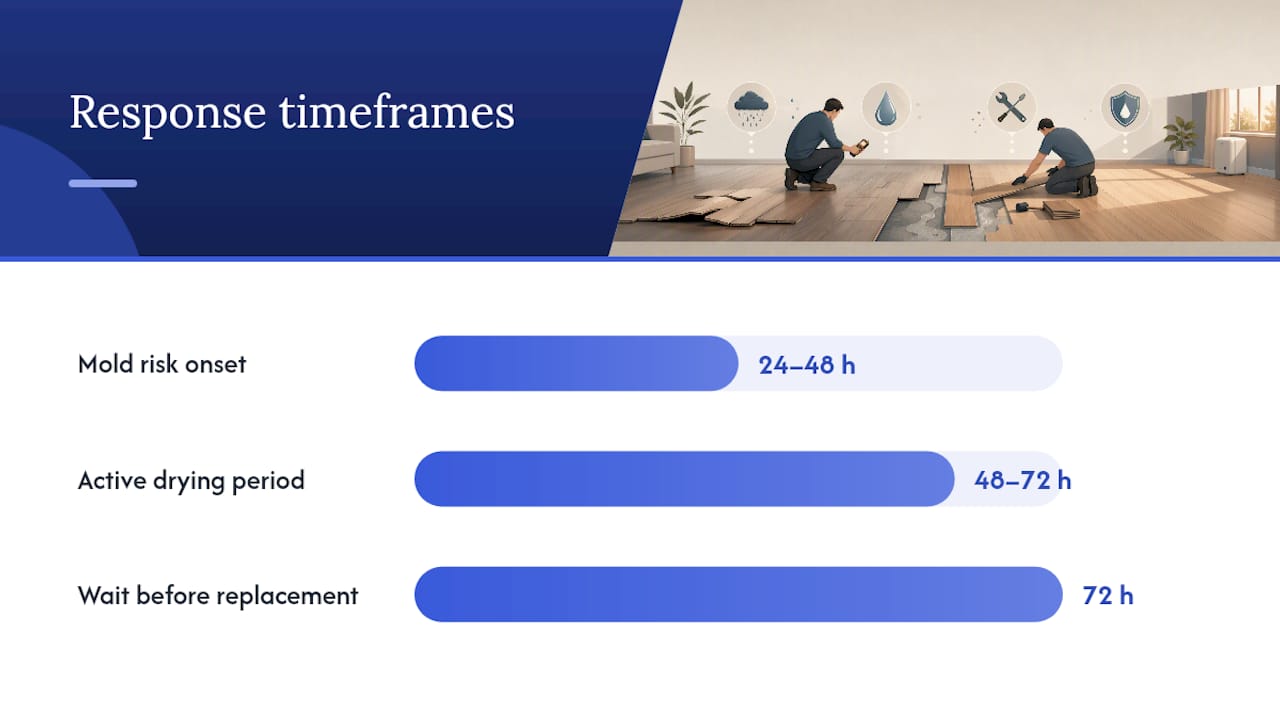
If the distortion is minor and the HDF core was not saturated, some planks may settle back toward flat as the area dries. Give it 72 hours of active drying before making a replacement decision.
For grey water (washing machine overflow) or black water (sewage), skip the DIY drying and call a licensed water-damage remediation contractor. Mold can establish within 24–48 hours in saturated conditions.
Should you repair it or replace it?
The decision comes down to whether the HDF core is structurally compromised.
Try drying and weighted flattening when: the distortion is minor, the moisture exposure was brief, the planks have not separated at the locking joints, and the surface layer shows no bubbling or delamination. Place heavy flat objects on the affected area after drying and wait several days.
Replace individual planks or sections when: the core is visibly swollen, the locking joints have separated or crumbled, the surface is bubbling or delaminating, or the planks remain distorted after 72 hours of drying. HDF-core swelling is usually permanent — the fiber structure does not return to its original density once it has absorbed enough moisture to swell.
Plan for full replacement when: the damage covers a wide area, the subfloor itself is damaged or moldy, or the existing product is discontinued and matching planks are unavailable.
How laminate replacement actually works
Laminate replacement means removing the baseboard trim, unlocking planks row by row from the nearest wall to the damaged section, swapping the bad planks, and relocking everything back. The main obstacles are staggered end joints (which require careful sequencing), glued trim that breaks on removal, and transition strips that may need replacement.
Thin wear-layer laminates are particularly difficult to repair in place because matching the surface pattern precisely is nearly impossible once a product has been discontinued. Replacing a single plank in the middle of a room often requires removing every plank between that plank and the nearest wall.
Single-row replacement is realistic DIY work for someone comfortable with basic tools. Multiple sections, suspected subfloor damage, or any situation involving mold warrants a professional installer.
Before you remove anything: if a warranty or insurance claim is possible, read the manufacturer’s warranty documentation and photograph the damage thoroughly. Many warranties are voided if the floor is altered before an inspection. A guide on handling flooring warranty claims can walk you through the documentation process.
How to prevent warping before it starts
Prevention is almost entirely an installation and maintenance discipline.
Installation checklist
- Acclimate the planks. Leave unopened boxes in the installation room for 48–72 hours so the planks reach equilibrium with the room’s temperature and humidity before installation.
- Test subfloor moisture. Use a moisture meter before laying any underlayment and follow the manufacturer’s recommended moisture thresholds for the subfloor.
- Install a vapor barrier over concrete. A 6-mil polyethylene sheet or a combination underlayment with a built-in vapor barrier is standard for slab-on-grade and basement installations. Subfloor preparation is one of the highest-leverage steps in preventing future moisture problems.
- Leave correct expansion gaps. A general rule: 1/4 inch at walls for rooms up to 26 feet; add 1/8 inch per additional 10 feet of run. Always follow the manufacturer’s specification, which overrides general rules.
- Never install floating laminate under fixed cabinetry without transitions. Use T-molding or threshold transitions to break up long runs and isolate fixed objects from the floating field.
- Use the correct underlayment thickness. Too thick creates excessive flex; too thin provides inadequate cushion. Match the underlayment to the plank profile per the manufacturer’s guidance.
Homeowner maintenance
Keeping indoor relative humidity between approximately 30% and 50% year-round is generally advised to help maintain floor stability. A whole-home humidifier in winter and air conditioning or a dehumidifier in summer handles most of this. Clean up spills within minutes. Use waterproof mats at kitchen sinks, dishwashers, and pet water stations.
Inspect appliance water lines annually. Slow leaks from ice makers, dishwashers, and water softeners are among the most common sources of gradual laminate damage. Slow leaks from appliance supply lines over time can saturate laminate flooring planks and cause damage.
Contractors prevent warping primarily through pre-install moisture testing, correct acclimation, appropriate underlayment and vapor barriers, and proper expansion gaps. Replicating those steps as a homeowner or DIYer gives you the same protection.
Pro Tip: For a quick expansion-gap check on an existing floor, remove one baseboard section and look for a gap. If the floor is flush against the framing with no space at all, that floor is a buckling risk regardless of moisture levels. Adding gap by trimming the plank edge is possible but requires removing the entire row to that wall.
Myth-busting: what “waterproof” laminate actually means
The term “waterproof” on laminate packaging refers to the wear layer’s surface resistance, not the product’s immunity to water damage. The HDF core remains hygroscopic. Moisture that reaches the core through seams, cut edges, or damaged surface areas will still cause swelling, and the HDF core can still absorb moisture at seams and edges even on products marketed as waterproof.
If you want a floor that genuinely tolerates wet conditions, luxury vinyl plank (LVP) is the more appropriate product. LVP uses a plastic composite core that does not swell when wet. For a direct comparison of how laminate and LVP handle moisture differently, the laminate vs. LVP guide covers the practical differences room by room.
Professional installers address this by using perimeter sealants at wet-adjacent transitions (kitchen-to-laminate thresholds, bathroom doorways) and by applying a bead of silicone at cut edges near water sources. These steps limit edge penetration and reduce the differential swelling that causes buckling near wet zones. Checking for pinch points before blaming the subfloor is another installer priority — consistent, linear buckling near cabinets strongly suggests movement restriction rather than bulk moisture.
Installer pre-install checklist:
- Confirm subfloor moisture readings are within manufacturer tolerance
- Install vapor barrier over all concrete substrates
- Check for level subfloor (within 3/16 inch over 10 feet is a common tolerance)
- Verify expansion gaps at all perimeters, door frames, and transitions
- Identify and eliminate all potential pinch points before laying the first row
- Apply perimeter sealant at wet-adjacent transitions
- Photograph the installation before covering with trim
A practical note from the field
The pattern I see most often in Michigan homes is a floor that buckled near the kitchen perimeter, and the homeowner’s first assumption is a bad product. Nine times out of ten, it turns out the cabinetry was installed directly on top of the floating floor, or the expansion gap was skipped to make the baseboard fit tighter. The floor was doing exactly what physics requires it to do.
Before you pull planks or file a warranty claim, spend 20 minutes with a putty knife checking every perimeter gap and looking under every appliance. That inspection costs nothing and frequently identifies the fix without a single replacement plank.
If you find moisture, document it with photos, stop the source, and dry the area for 72 hours before making any decisions. If the floor is still distorted after drying, or if you suspect subfloor damage or mold, that is the moment to call a professional. Quality Hardwoods of Michigan, Inc carries replacement laminate and can connect you with experienced installers across Michigan who know how to diagnose these problems correctly the first time.
Ready to replace or upgrade your floor?

If your laminate has reached the point where replacement makes more sense than repair, Quality Hardwoods of Michigan, Inc stocks a full range of laminate flooring options and luxury vinyl plank for Michigan homeowners and contractors. Stop by the showroom, call for a quote, or browse online. For projects requiring professional installation, the new construction and replacement installation service connects you with vetted local installers who follow manufacturer specs from day one.
Sources
Manufacturer installation guides and warranty documents are the first place to check for expansion-gap tolerances, moisture thresholds, and acclimation requirements specific to your product. Warranty wording varies significantly between brands, and many claims are denied because installation deviated from the published spec.
For installation standards and inspector guidance, the National Wood Flooring Association (NWFA) publishes installation and maintenance guidelines that apply broadly to wood-based flooring systems, including laminate. InterNACHI’s laminate floor inspection resources cover common defects and diagnostic methods useful for both homeowners and inspectors.
For water-damage remediation, professional water damage response generally follows established standards such as the IICRC S500, which guides licensed remediation contractors.
Quality Hardwoods of Michigan, Inc maintains several resources worth bookmarking: the warped floors causes and prevention guide covers broader warping scenarios, and the laminate flooring Q&A answers common installation and maintenance questions from a Michigan professional’s perspective.
- Laminate Floor Problems: Causes and Inspection
- Why Is My Laminate Floor Buckling? 6 Reasons Why | Angi
- How to Repair Laminate Flooring | BobVila
- Laminate Floor Damage Repair | InspectAPedia
- Moisture and Wood Floors Guide | Prevent Warping, Gaps & Damage
- How Do Contractors Prevent Hardwood Floor Warping? - America’s Advantage Remodeling
- Warped Flooring: Pros, Cons, and Buying Guide - D and G Flooring
FAQ
How do you fix warped laminate flooring?
For minor warping, remove the moisture source, dry the area with fans and a dehumidifier for 48–72 hours, and place weighted flat objects on the affected planks. If the HDF core has swollen or the locking joints have separated, the affected planks need to be replaced by unlocking rows from the nearest wall and swapping the damaged sections.
Will warped laminate floors go back to normal on their own?
Sometimes, if the moisture exposure was brief and the HDF core did not fully saturate. Planks that have visibly swollen, bubbled, or separated at the joints rarely return to their original dimensions and typically require replacement.
How do you stop laminate floors from warping?
Maintain indoor relative humidity within the recommended moderate range for comfort and floor stability, clean up spills immediately, leave correct expansion gaps at all perimeters, install a vapor barrier over concrete subfloors, and inspect appliance water lines annually for slow leaks.
What is the average lifespan of laminate flooring?
Laminate flooring’s lifespan varies widely under normal residential conditions, depending on wear-layer thickness and maintenance. Moisture damage and installation errors are the most common reasons floors fail well before that range.
Recommended
- Warped Wood Floors: Causes, Prevention & Solutions | Quality Hardwoods
- Laminate Flooring Downsides | Quality Hardwoods of Michigan
- Laminate Flooring Questions Answered by a Michigan Professional | Quality Hardwoods of Michigan
- Top 10 Laminate Flooring Questions Answered by Experts | Quality Hardwoods of Michigan