
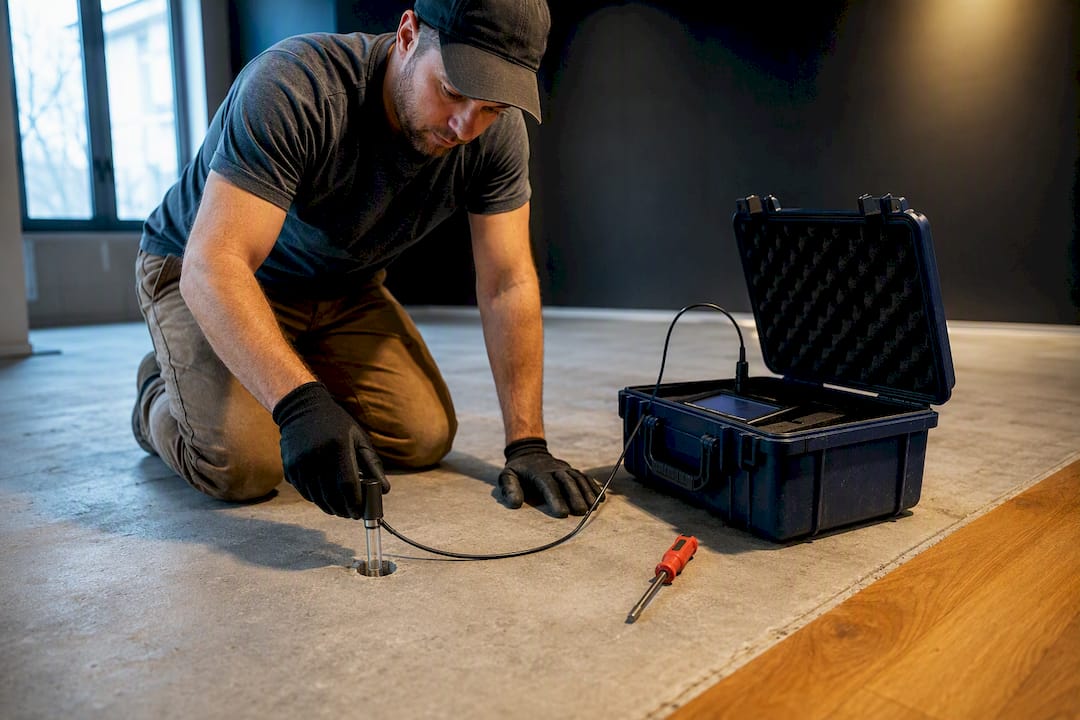
Yes, engineered hardwood can be installed over concrete, using either glue-down or floating methods, but only after the slab passes a proper moisture test. Skip that step and you’re gambling on cupped boards or a failed bond within a year. Nail-down isn’t a direct option here; it needs a plywood subfloor or sleeper system first. Everything else, adhesive, underlayment, even plank width, follows from what your moisture readings tell you.
TL;DR:
- Engineered hardwood can be installed directly on concrete using glue-down or floating methods only if the slab passes moisture tests and is properly prepared.
- Moisture testing with ASTM standards F1869 and F2170 should be conducted at least 60 days after pouring, with multiple readings taken and documented carefully.
- Flatness of the slab must stay within 3/16 inch over 10 feet, requiring grinding or self-leveling if necessary, and the surface must be clean and free of contaminants before installation.
- For wide planks over 5 inches or borderline moisture levels, glue-down installation with moisture-control adhesives is recommended, while floating floors suit narrower planks and higher moisture readings with appropriate vapor barriers.
- When moisture exceeds product ratings, consider using a mitigation membrane or moisture-control adhesive rather than forcing standard materials that could fail later.
Table of Contents
- Can You Install Hardwood Directly on a Concrete Subfloor?
- How Do You Test a Concrete Slab for Moisture Before Installing Hardwood?
- Preparing the Concrete Subfloor for Engineered Hardwood
- Glue-Down, Floating, or a Plywood Subfloor: Which Method Fits Your Project?
- Adhesives and Underlayments for Concrete Installations
- How Do You Glue Down Engineered Hardwood on Concrete?
- How Do You Float an Engineered Hardwood Floor on Concrete?
- Acclimation, Trim, and Everyday Care
- Common Installation Mistakes and When to Call a Professional
- What Quality Hardwoods of Michigan Has Learned From 40 Years of Installs
- When Engineered Hardwood Beats Waterproof Alternatives
- Get the Right Materials for Your Concrete-Slab Flooring Project
- Sources
- FAQ
Can You Install Hardwood Directly on a Concrete Subfloor?
You can install engineered hardwood directly on concrete, but “directly” doesn’t mean skipping preparation. Solid hardwood isn’t recommended over slab because it moves too much with humidity swings; engineered construction uses cross-layered plies under a wood veneer, which keeps that movement in check and makes it the product built for this job, including below-grade rooms and radiant-heated slabs.
The two real methods for going straight onto concrete are glue-down and floating. Nail-down is a different animal entirely: it demands a nailable base, so you’d first install 3/4-inch plywood or a sleeper system over the slab. That adds height and cost, which is why most concrete installs skip it in favor of gluing or floating.
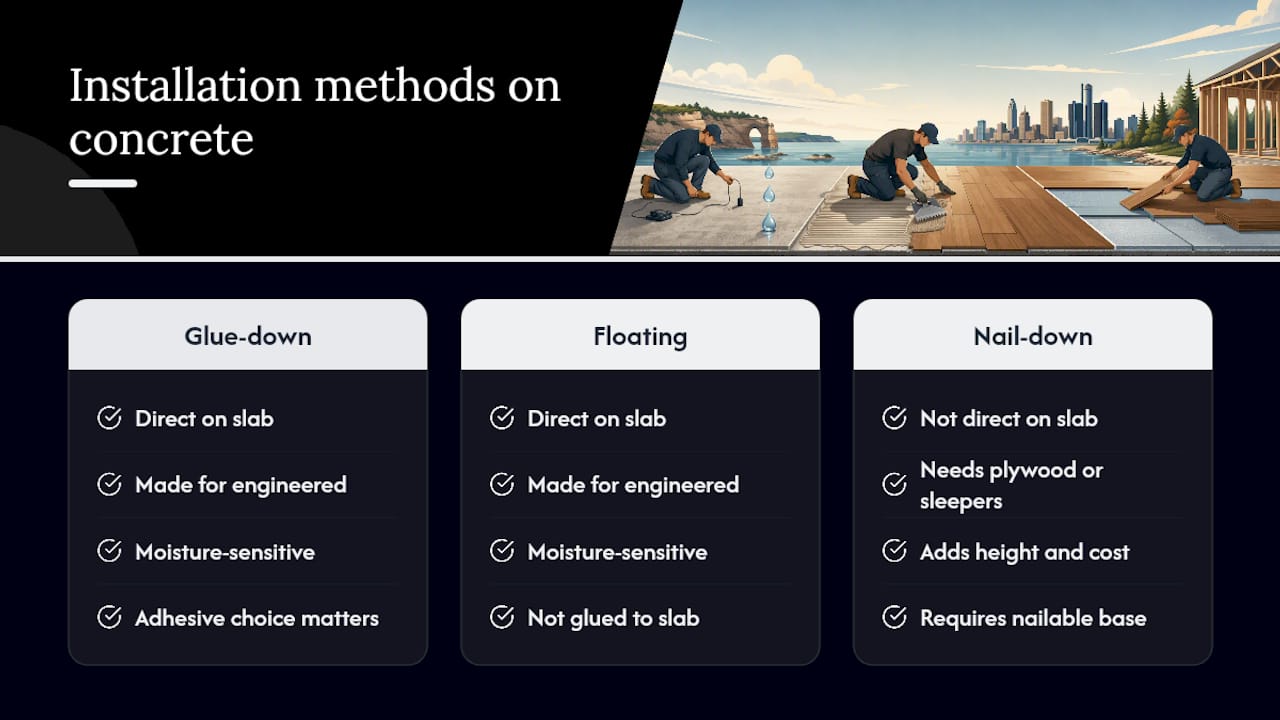
Moisture is what decides everything downstream, which adhesive you can use, whether you need a vapor barrier, and sometimes whether you install at all this week. That’s the next stop.
How Do You Test a Concrete Slab for Moisture Before Installing Hardwood?
Two ASTM standards govern this: F1869, the calcium chloride test, and F2170, which uses in-slab relative humidity probes. Both beat the old plastic-sheet trick, which tells you almost nothing reliable about what’s happening inside the slab.
Industry guidance generally caps acceptable moisture vapor emission rates and in-slab relative humidity at practical thresholds, though you should always defer to the specific adhesive or flooring manufacturer’s technical data sheet, since thresholds vary by product line.
Here’s how to run the test correctly:
- Take at least three readings per 1,000 square feet, more in larger rooms or where slab conditions look inconsistent.
- Place calcium chloride domes or RH probes away from exterior walls, HVAC vents, and direct sunlight, which all skew results.
- Wait at least 60 to 90 days after a fresh pour before testing; new concrete is still releasing moisture and will fail almost any test early on.
- Log every reading with date, location, and ambient temperature and humidity, since manufacturers may ask for this documentation if a warranty claim comes up later.
Pro Tip: If your readings sit right at the threshold line, don’t round down. Order the moisture-control adhesive anyway. The cost difference is minor compared to tearing out a bonded floor.
If a slab has had recent water exposure, a burst pipe, flooding, even heavy pressure-washing nearby, pause the install and retest after it dries. Readings that come in high don’t necessarily kill the project; they just point you toward a moisture-control adhesive or a separate mitigation membrane instead of a standard product.
Preparing the Concrete Subfloor for Engineered Hardwood
Flatness matters as much as moisture. Most adhesive and flooring manufacturers want the slab within 3/16 inch over a 10-foot span, checked with a straightedge or laser level. Beyond that tolerance, glue-down installs develop voids under the adhesive, and floating floors can flex at seams and eventually click apart.
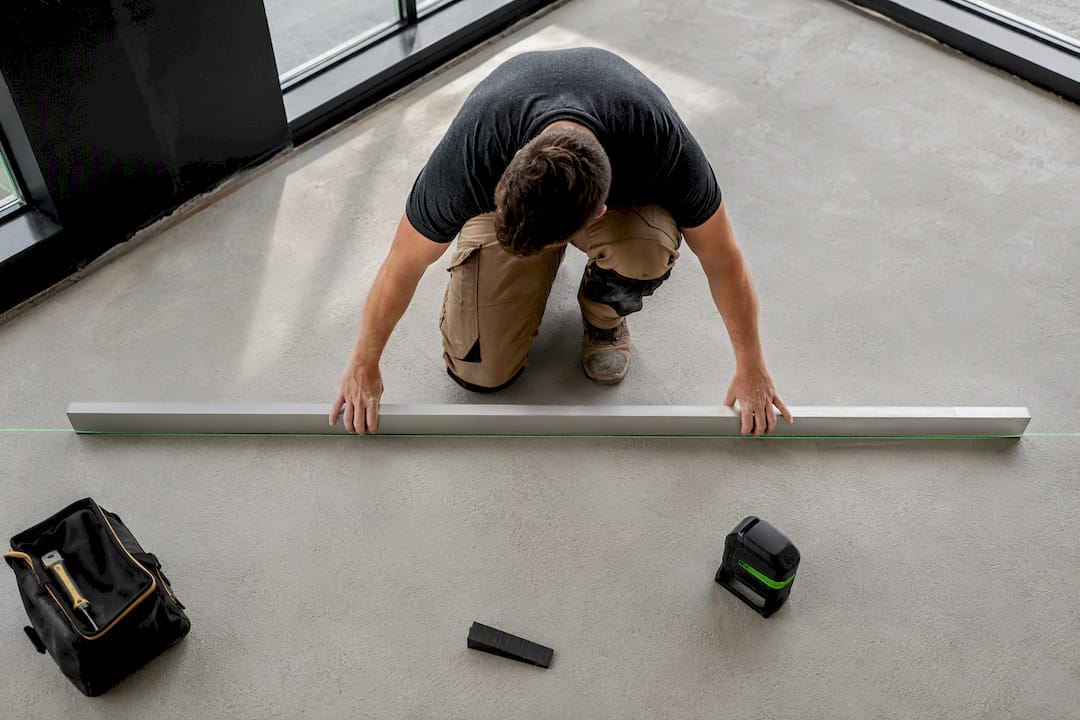
Fixing an out-of-tolerance slab usually means two moves: grinding down high spots and filling low spots with a self-leveling underlayment. Products like Planiprep or Planipatch handle minor patching and typically cure within a few hours to a day depending on depth and ambient temperature, always check the specific product’s data sheet before scheduling your install day around it.
Before anything goes down, the slab needs to be clean. That means:
- Removing curing compounds, sealers, paint overspray, and any adhesive residue from old flooring.
- Sweeping and vacuuming thoroughly, since fine dust prevents proper adhesive bonding.
- Priming the surface if your chosen adhesive’s technical data sheet calls for it, not every product needs this step.
Slabs with radiant heat or embedded plumbing and electrical need extra care. Never use power-actuated fasteners on these floors, and if the slab has radiant heat, the manufacturer’s guidance generally calls for turning the system off before testing and installing, then bringing it back up gradually once the floor has cured.
Pro Tip: Mark the location of radiant tubing or embedded conduit on a simple sketch before you patch or grind. You’ll thank yourself later if you ever need to drill for a threshold or transition strip.
Glue-Down, Floating, or a Plywood Subfloor: Which Method Fits Your Project?
The right method depends on plank width, moisture readings, and how the floor needs to perform, not personal preference alone.
- Glue-down gives you the most solid underfoot feel and is generally the better call for wide planks (5 inches or wider), which need more restraint against seasonal movement. It demands low moisture readings or a moisture-control adhesive, plus more labor and dry time.
- Floating is faster, more forgiving for DIY installers, and works well when you need acoustic underlayment for a condo or want a reversible install. It still requires a vapor retarder under the underlayment when the slab tests anywhere near the moisture threshold.
- Plywood or sleeper subfloor with nail-down makes sense when you want the traditional solid-plank feel and nailing flexibility, but expect added floor height and cost that glue-down and floating avoid.
A quick way to sort it: if your planks run wider than 5 inches, lean glue-down. If moisture readings are borderline and you want a straightforward install, go floating with a proper vapor retarder underlayment. If you’re set on nail-down or need a taller finished floor for other reasons, budget for the plywood subfloor route up front. HOA sound rules, common in condos, often settle the floating-versus-glue-down debate before moisture even enters the conversation.
Adhesives and Underlayments for Concrete Installations
Adhesive selection isn’t a matter of taste; it’s a direct response to your moisture numbers. MAPEI’s technical guidance ties specific products to specific readings: standard urethane adhesives like the Ultrabond ECO 980, 977, and 975 handle typical slabs, while Ultrabond ECO 995 and 985 step in as moisture-control adhesives once MVER or RH readings exceed the standard product’s rating. TEC offers a comparable lineup, Wood Assure, Wood Endure, Wood Go, and Wood Ready, each rated for a different moisture band, so match the product to your actual test result rather than whatever’s on the shelf.
For floating installs, the underlayment does double duty. Look for 2-in-1 vapor and acoustic underlayments when the slab shows any measurable moisture, or cork if sound dampening matters more than vapor control, just verify the perm rating meets what your flooring manufacturer specifies.
A few numbers worth remembering:
- Aim for roughly 90 percent adhesive transfer when you check the trowel ridges against the back of a lifted plank.
- Roll glue-down floors with a 100 to 150 pound roller to seat the planks fully into the adhesive.
- Restrict light foot traffic for 8 to 10 hours and heavy traffic or furniture for a full 24 hours after installation.
If readings come in well above what a moisture-control adhesive can handle, that’s your signal to bring in a sheet membrane or a liquid-applied system rather than push a product past its rated limit.
How Do You Glue Down Engineered Hardwood on Concrete?
Glue-down rewards patience more than speed. Run through this sequence and you’ll avoid the callbacks that come from rushing.
- Confirm moisture test results, flatness, and that your planks have acclimated in the room for the manufacturer’s specified window, typically several days at normal room temperature and humidity.
- Plan your layout first, snap chalk lines, and account for expansion gaps around the perimeter before any adhesive touches the floor.
- Spread adhesive with the trowel size specified on the product’s technical data sheet, working in small sections so it doesn’t skin over before you set planks.
- Set planks into the wet adhesive immediately, keeping joints tight and alignment square; use weighted bags or clamps on any bowed boards until the adhesive grabs.
- Lift a random plank in each room to check for that 90 percent transfer mark, then roll the entire floor with a 100 to 150 pound roller to remove trapped air.
- Hold off on light traffic for 8 to 10 hours and heavy loads for 24 hours, and inspect for voids or hollow spots by walking the floor before you sign off.
Pro Tip: Keep a damp rag nearby while gluing. Adhesive squeeze-out that dries on the plank face is far harder to clean off later than it is to wipe now.
How Do You Float an Engineered Hardwood Floor on Concrete?
Floating installs move faster, but small mistakes with the underlayment or expansion gap show up as squeaks or buckling months later.
- Roll out your underlayment with seams taped or sealed, running it perpendicular or parallel to the planks per the manufacturer’s instruction.
- Start your first row against a straight wall, staggering end joints at least 8 inches between rows to avoid a repeating pattern that also weakens the joint line.
- Click and tap planks together using a tapping block, never a hammer directly on the plank edge, which chips the finish.
- Leave an expansion gap of at least 3/8 inch around the perimeter, widening it slightly in rooms with big seasonal humidity swings, and cover the gap with base trim or a transition strip.
For condos with acoustic requirements, pair the underlayment’s sound rating with your building’s specific IIC or STC target before you buy; a 2-in-1 vapor and acoustic product often satisfies both moisture and sound rules in one layer.
Acclimation, Trim, and Everyday Care
Planks need time in the room before installation, generally several days, though the exact window varies by manufacturer, so check the technical data sheet rather than guessing. This lets the wood settle to the room’s actual humidity instead of whatever it was at the warehouse.
When installing trim, keep it resting on the baseboard or shoe molding, not nailed through the plank, so the floor can still expand and contract seasonally. A few care notes worth keeping on hand:
- Wipe up spills immediately; engineered hardwood resists moisture better than solid wood but isn’t waterproof.
- Use a humidifier or dehumidifier to keep indoor relative humidity in a stable range year-round, especially in Michigan’s swing seasons.
- Stick to cleaners made for wood floors; steam mops and standing water are the fastest way to undo a good install.
Common Installation Mistakes and When to Call a Professional
Most failures trace back to a handful of shortcuts. Skipping flatness checks, moisture testing, or slab curing time causes the majority of early flooring failures, according to flooring professionals who see these jobs come back for repair.
Watch for:
- No moisture test at all, or testing right after a pour instead of waiting the recommended cure window.
- Using a standard adhesive where a moisture-control product was actually needed.
- Skipping the vapor retarder under a floating floor “because the slab looked dry.”
- Poor slab prep, patched low spots that weren’t given time to cure, or high spots left unground.
If you spot cupping, visible gaps between boards, adhesive letting go in patches, or hollow-sounding spots when you tap the floor, stop and investigate before the problem spreads. Persistent moisture exposure is what drives most wood warping in the first place, so trace the source before replacing boards.
Pro Tip: Keep your original moisture test logs and adhesive TDS on file. If you ever need a professional to diagnose a failure, that paperwork cuts diagnostic time dramatically.
What Quality Hardwoods of Michigan Has Learned From 40 Years of Installs
Quality Hardwoods of Michigan has spent more than four decades supplying flooring materials to contractors, builders, and homeowners across the state, and moisture-related callbacks are the recurring theme in nearly every concrete-slab conversation that happens on the showroom floor.
The practical heuristic the team shares most often: match plank width to method before anything else. Planks over 5 inches wide go glue-down almost every time readings allow it, while narrower engineered products handle floating installs without issue. On borderline moisture readings, reach for a moisture-control adhesive rather than hoping a standard product holds.
Homeowners and installers working through a project can visit the showroom to compare actual plank samples against their moisture results, or review the subfloor requirements guide for the plywood-over-slab option when nail-down is the goal.
This section reflects guidance compiled by Mike Solomich.
When Engineered Hardwood Beats Waterproof Alternatives
Engineered hardwood earns its place in living rooms, bedrooms, and finished basements where humidity stays controlled and spills are rare, not laundry rooms or walk-in showers. For those wetter spaces, waterproof LVP is usually the smarter call, even on the same slab. The projects that go smoothest are the ones where the homeowner picks the material for the room’s actual conditions, not just the look they want.
— Mike Solomich
Get the Right Materials for Your Concrete-Slab Flooring Project
Every method covered here, glue-down, floating, moisture-control adhesive, vapor-retarder underlayment, only works as well as the materials behind it. Quality Hardwoods of Michigan, Inc stocks the engineered hardwood, adhesives, and underlayments this guide references, so you’re not chasing down three different suppliers to finish one room.

The showroom lets you handle actual plank samples against your project’s moisture readings before you commit, and the team can point you toward the right adhesive band for your slab’s test results rather than the one that happens to be in stock. If your plans call for a plywood subfloor instead of a direct glue-down or float, browse the hardwood flooring options for new construction to see what fits your build. For wetter rooms where engineered wood isn’t the right call, the luxury vinyl plank selection covers the waterproof side of the same project. Request a quote or stop by the showroom to get your material list matched to your actual slab conditions before installation day.
Sources
- How to Install Engineered Hardwood Over Concrete Substrate | TEC
- MAPEI specification: Engineered wood flooring over concrete
- How to install hardwood floor on concrete (3 methods) — WoodworkingAdvisor
- Engineered hardwood vs solid flooring — The Spruce
FAQ
Is It Better to Glue or Float an Engineered Wood Floor on Concrete?
Glue-down suits wide planks and slabs with low moisture readings, giving a solid, traditional feel. Floating is faster, more DIY-friendly, and preferable when moisture readings are borderline or acoustic underlayment is needed.
What Should You Put Under Engineered Hardwood on Concrete?
For floating floors, use an underlayment rated for both vapor control and sound, or add a separate vapor retarder if the slab shows any measurable moisture. For glue-down, a moisture-control adhesive itself often serves as the vapor barrier when readings exceed standard limits.
Can Engineered Flooring Be Installed Directly on Concrete?
Yes, through glue-down or floating methods, but only after the slab passes ASTM F1869 or F2170 moisture testing and meets flatness tolerances. Nail-down requires a plywood or sleeper subfloor first, since it can’t fasten directly into a concrete slab.
How Do You Glue Down Engineered Hardwood on Concrete?
Spread the manufacturer-specified adhesive with the correct trowel, set planks immediately while maintaining tight joints, then roll the floor with a 100 to 150 pound roller. Restrict light traffic for 8 to 10 hours and heavy traffic for 24 hours while the adhesive cures.
How Do I Know If My Slab Is Too Wet for Hardwood?
If ASTM F1869 calcium chloride results exceed roughly 3 lbs per 1,000 square feet per 24 hours, or F2170 in-slab RH readings run above about 75 to 80 percent, standard adhesives typically won’t hold. A moisture-control adhesive or separate mitigation membrane becomes necessary at that point.